


What is a Code Base of Flutter App?
A Flutter app's codebase is similar to an Android app's codebase in terms of functionality but with some key differences due to Flutter's approach to app development. Here's a breakdown:
Similarities:
Contains Source Code: Just like Android, the codebase includes the core logic written in a programming language. In Flutter's case, the primary language is Dart. These Dart files define the app's features and behaviour.
Has Resource Files: Similar to Android, Flutter apps use resource files. These include things like:
Layouts: Define the app's UI structure using widgets (Flutter's building blocks for UI).
Images: Used within the app's interface.
Strings: Text displayed in the UI.
Uses Configuration Files: These files specify settings for the app, similar to Android (app name, icon, permissions).
Differences:
Single Codebase for Multiple Platforms: A key advantage of Flutter. The same codebase can be used to build apps for Android, iOS, and other platforms supported by Flutter (web, desktop). This is unlike traditional Android development where the codebase is specific to Android.
Focus on Widgets: Flutter uses widgets for building the UI. These widgets are pre-built components (buttons, text fields, etc.) or custom-made ones that you can create. The codebase will involve building and arranging these widgets to create the desired UI.
Overall Structure:
The codebase is organised within a project directory structure. Flutter doesn't have a single enforced structure, but there are common conventions used by developers. These conventions promote the organisation and maintainability of the code.
Now, before moving on and directly starting coding on your Flutter App there are certain things that needs to be kept in mind such as what are the functionalities of your app, what is the file structure going to be, what functions would be present in the app,
What assets and images are we going to use, how will the UI for the app look like etc…
Here are a few steps that one should follow to setup Code Base for their Flutter App:
- Deciding how the UI would look:
For any developer, understanding the desired application's look and feel is crucial before diving into code. This can be achieved through two main scenarios:
Design Blueprint or UI Mockup: If you're working with a designer, they may provide a blueprint or UI mockup that outlines the app's visual layout and functionality. This serves as a roadmap for your development process.
Freelancer with Design Skills: If you're a freelancer wearing both developer and designer hats, you might have already created the UI design using tools like Figma or Adobe XD. Having this visual reference beforehand streamlines your development workflow.
In essence, having a clear idea of the app's visual design upfront saves time and ensures you're building towards a well-defined goal.
- What would be the Functionality of your App.?
Following the importance of visual design, the next crucial step involves defining the app's functionality and user interface (UI) layout. This includes:
App Functionality: Clearly outlining all the features and actions the app will allow users to perform. This ensures the app addresses the intended purpose and user needs.
UI Layout: Determining the placement of all UI elements - buttons, images, icons, and text. This layout should be intuitive and user-friendly, guiding users effortlessly through the app's functionalities.
By meticulously planning both functionalities and UI layout, you achieve two key benefits:
Enhanced User Experience: A well-defined UI layout with clear functionality makes the app easy to understand and navigate for users.
Streamlined Development: Having a clear roadmap of what needs to be coded saves developers time and effort, as they can focus on implementing the planned functionalities within the designed UI.
In short, planning these aspects beforehand fosters a user-centric app with a clear purpose and efficient development process.
- How should the file structure be for the App?
This is Step is one of the most crucial Step in the development process and is often ignored by many beginner developers leading to complete messy code structure and lots of issues while debugging the code.
As we know Flutter does not provide any specific file structure for writing code and there is just one single file often named “main.dart” where all the code can be written, but generally there are 2 file structure that can be followed while creating file structure for your flutter app:
1)Layer based.
2)Feature-based.
Layer based:
Layer-based file structure is one approach to organizing your Flutter app's codebase. It separates the code into distinct layers based on their responsibility within the app's architecture. This can improve code maintainability and readability as the project grows.
Here's a breakdown of the concept:
Layers:
The specific layers can vary depending on the chosen architecture, but some common ones include:
Presentation: This layer deals with the visual elements of the app. It includes files for widgets (building blocks of the UI), state management (handling UI updates), and controllers (mediating between UI and other layers).
Domain: This layer contains the core business logic of the app. It defines data models (representing app data) and business logic classes (implementing core functionalities).
Data: This layer interacts with external data sources like APIs, databases, or local storage. It includes repositories (providing access to data) and data sources (concrete implementations for fetching data).
External: This layer (optional) encapsulates functionalities from external libraries or system features, keeping them isolated from the core app logic.
File Structure:
Within the project's main directory, each layer would have its own subdirectory. Inside these subdirectories, you would further organize files based on their specific purpose within the layer.
Here's an example structure:
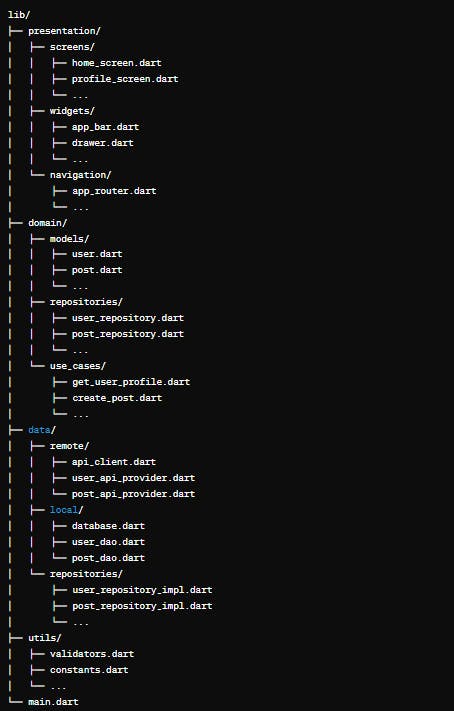
Benefits:
Improved Maintainability: Separating code by responsibility makes it easier to find, understand, and modify specific parts of the app.
Increased Readability: Developers can focus on understanding code within a single layer for a specific purpose.
Scalability: As the app grows in complexity, the layer-based structure can help manage the codebase effectively.
Drawbacks:
Overhead for Smaller Projects: For very simple apps, the overhead of managing multiple layers might be unnecessary.
Potential for Boilerplate Code: Setting up the layer structure might involve creating some boilerplate code initially.
Alternatives:
Another common approach is the feature-first structure, where code is organized around features of the app. This can be more intuitive for smaller projects.
Ultimately, the best structure depends on your project's specific needs and complexity. Both layer-based and feature-first approaches have their merits, so choose the one that best suits your development process.
Feature Based:
In Flutter development, a feature-based file structure prioritizes organizing code around the functionalities (features) of your app. This approach groups all the necessary components for a particular feature within a dedicated folder, promoting better maintainability and scalability for complex applications.
Here's a deeper dive into feature-based structure:
Core Concept:
Imagine your app as a collection of features, each offering a specific functionality. For instance, a login feature, a product listing feature, or a shopping cart feature. In this structure, each feature would have its own directory within the project's main directory.
Benefits:
Enhanced Organization: Grouping feature-related code together makes it easier to locate and manage specific functionalities. This is particularly helpful for larger projects with numerous features.
Improved Maintainability: When modifications or bug fixes are needed within a feature, developers can focus solely on the relevant files within the feature's directory.
Simplified Collaboration: With clear separation between features, developers working on different features can collaborate more efficiently without code conflicts.
Scalability: As you add new features to your app, the structure easily accommodates them by adding new feature directories.
Example Structure:

Things to Consider:
Shared Components: While features are self-contained, you might have reusable components (widgets, services) used across multiple features. These can be placed in a separate directory for shared components within the lib directory.
Complexity for Simple Apps: For very basic apps with few features, a feature-based structure might be an overkill. In such cases, a simpler structure might suffice.
Comparison with Layer-Based Structure:
Another common approach is the layer-based structure, which separates code based on its responsibility (presentation, domain, data). While both structures offer benefits, here's a quick comparison:
| Feature | Layer-Based Structure |
| Focus | Functionality (Features) |
| Organization | Responsibility (Presentation, Domain, Data) |
| Suitability | Complex Apps |
| Benefits | Maintainability, Scalability |
| Drawbacks | Overhead for Simple Apps |
| Shared Components | Requires Careful Planning |
4)Pushing your source code and file structure on Git for Team collaboration.
The last thing one should do before coding and starting the development is to push the repositories made by the developer on Git so that a collective team collaboration can be made on the project if needed and one always has a chance to go back to older code if needed.